Creative Juices Design
  • Home
  • Logos
  • Websites
    • Website Design Service
    • Domain Name Search
    • Web Hosting
    • Custom Video Productions
  • Design Services
    • Book Design
    • Brochure Design
    • Stationery
    • Postcards
    • Ad Design
    • CD Design
    • Writing and Editing
    • Displays and Signage
    • Marketing
    • Printing
    • One on One Design Help
    • FAQs
    • Web Site Terms and Conditions of Use and Privacy Policy
  • About
  • Blog
  • Contact

Archive for Technology

23 Nov

Thanksgiving-Eve Marketing News You Can Use

Thanksgiving is a time to be grateful for what you have. It’s also a good time to work on getting more… business that is.

Here are some helpful business marketing articles I’ve found interesting:

Measuring Offline Vs. Online Word-of-Mouth Marketing

Five New Online Tools for Finding Local Customers

Social Media: 4 Simple Principles To Convert the Harshest Critics

The Lede: 7 Writing and Marketing Links You Don’t Want to Miss


If you use WordPress to design your own website, checkout Premise:

Get Premise Ultimate for only $95.

Copyblogger Media just released version 1.2 of their Premise landing page software for WordPress, and it includes lots of cool new features and refinements.

Most impressive of all is the introduction of an innovative 8th landing page type — the social sharing page.

Premise Ultimate usually goes for $165, as it gives you:

1. All the landing pages you can build
2. Use on as many domains as you want
3. Access to ongoing optimization seminars
4. Copywriting advice from inside WordPress
5. 1,100+ custom graphics by Rafal
6. Unlimited technical support
7. Unlimited updates (you’ll thank yourself for this next year)

During their Thanksgiving sale, you can get Premise Ultimate for only $95. Yes, really.

Just use the code THANKS when you check out and you’ll save $70 on the best landing page software available for WordPress.

This deal ends promptly at 7:00 pm Pacific time on Monday, November 28, 2011. Hurry up and get Premise Ultimate before they come to their senses!

Blogging to promote business. Business Practices Helpful Hints Marketing 101 Online Marketing Search Engine Optimization (SEO) Technology Website Design WordPress
25 Jul

6 Easy Steps to Creating iPhone and iPad Shortcut Buttons

All the book reading apps from Kobo, Kindle, Nook (Barnes & Noble) and Google were updated.

The result is that the “buy” buttons that linked to their web stores have been removed. This has been an ongoing controversy ever since Apple changed their policy about in-app purchases.

It turns out that all e-booksellers would rather delete the in-app purchase button rather than pay Apple 30% for each purchase.

An Easy Solution

There’s an easy and pain-free way to set up your own bookstore app button that’s at least as good as, if not better than, the button in each app.

  1. Go to Safari and find the website for Kindle Books, Nook Books, Kobo Books, and Google Books. Of course you’re doing these one at a time.
  2. When you get to the page you desire, click the “bookmark” button at the top of your iPad browser or the bottom of your iPhone browser. It is a little box with a curved arrow.
  3. Select “Add to Home Screen”.
  4. Edit what you want the icon to say and press “Add”.
  5. An icon for the website will show up in your browser. Amazon’s icon looks the best.
  6. Just place this icon next to the original reader app and you’re done.

You can read your books in the Kindle, Nook, Kobo, Google app as before. And when you want to buy a book, click on the new icon bookmark you created and you will instantly get to the same place the original in-app button sent you.

Update 8/10/11: Today Kindle released a “Cloud Reader”. It is an html5 version of their Kindle reader. You can go to Safari on your iPad and visit www.amazon.com/cloudreader. It works just like the Kindle app with the addition of a link to the Kindle eBookstore. Plus you can create an icon for your home screen. I assume an iPhone version will be coming soon. Also Nook is working on a similar “web app”.

Apple Apps iPad iPhone Technology
08 May

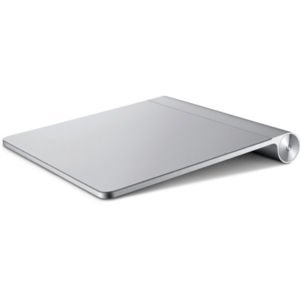
Apple’s Amazing Magic Trackpad

Being an Apple geek I purchased Apple’s Amazing Magic Trackpad the day it came out. After a little practice I’ve learned to love this gadget.

It’s sleek and looks great next to my wireless keyboard. The glass surface is smooth and easy to use. You just have to make sure your fingers are clean and dry. Like using your iPhone or iPad, if your fingers are damp there’s too much friction to move them over the surface.

Double tapping is the same as clicking. It takes a little getting used to. Use two fingers to scroll. On the “Mighty Mouse” you only need one finger to scroll, so if you use both you may get a little confused.

The batteries last quite a while. I use the cheap Costco batteries and still get at least 2-3 months usage from them. And it’s easy to change the batteries. All you need is a coin to open the side slot and simply change the batteries. Don’t forget to press the side button to turn it back on. Hold for a few seconds until you see the miniscule light blink on. This sets the bluetooth connection.

With the new Lion operating system coming out this Summer I believe the Magic Trackpad will have many new, convenient uses. For the price, I’d say this is a great product, especially if you use an iMac.

Disclaimer: I am an Amazon affiliate. Even still, I love the Magic Trackpad and highly recommend it.

Apple Technology
01 Apr

Setting Up a Clickable Header Using Artisteer and WordPress

It’s a common practice that the header image of most websites link back to the home page. People expect this.

Linking your Header Home Using Artisteer and WordPress

What if you’re using Artisteer to create a WordPress template?

Here’s a simple way to link your header back to your home page.

(Before making any changes to the page.php code, copy the original code and save it someplace. If you mess up you can always return things to the way they were.)

1. Find the art for the header. It should be located in the wp-content folder in the theme folder under “images”. It would be called “header.jpg”.

Figure out the exact url for this image, or copy it to an easier location and upload it to your server. You will have to locate this exact url, either way.

2. Log into your wp-admin account.

3. Go to Appearance in your Admin page.

4. Click on Editor

5. Find “Page Template” (page.php) on the right hand side and click.

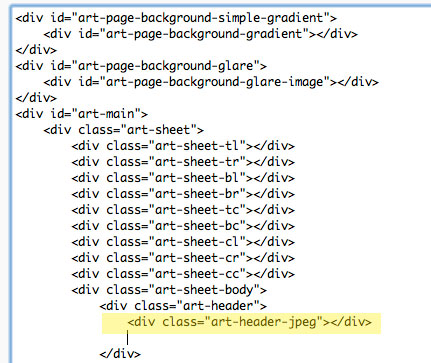
6. Look for the following highlighted code:

Original code for page.php header image.

7. Replace this highlighted code with the new highlighted code below:

Make sure to use your own domain name as well as the entire url address of the header art. Also include the proper height and width.

8. Update the page template.

You should now be able to click on your header from any page and it will take you home.

If you see a little box with a ? in it, that means either you do not have the correct, exact url for the header image or you did not upload it to the server.

For more details check out the Artisteer Forum.

Helpful Hints Technology Website Design
29 Mar

What is a Favicon and Why Do I Need It?

“Favicon” is short for favorites icon. It is the tiny little image you see right next to your domain name in the browser’s title bar and bookmark.

Creating a Favicon is easy, sort of

All you need to do is create a 16 x 16 pixel .ico file. Start off in Photoshop or any image editing program. Use your logo or brand image and create a mini jpg file.

Then can go to a site like favicon and upload your jpg image.

Convert your jpg into an ico

Once you upload your new jpg icon into a favicon generator site, you just have to name it favicon.ico and export that ico image to your hard drive. Then, using FTP or Dreamweaver just place that image into your site’s root folder.

Even easier if you use WordPress

If you’re using WordPress, the “Shockingly Simple Favicon Options” plugin is an easy way to set up your favicon.

If you don’t use WordPress, check out Dynamic Drive’s Favicon Generator or Free Favicon Generator from Website Planet.

Adding a favicon to your website is a great way to help build your image or brand. It also makes your site look a little more professional.

Branding Design Helpful Hints Marketing 101 Technology
03 Mar

You Will Lose Your Data Unless You Backup

Hard drives crash and burn

It’s inevitable. You will lose all your data unless you regularly backup.

It’s happened to me. There I was, sitting at my computer when whoosh, the hard drive crashed. On my iMac. Can you believe it?

You think restarting will fix the problem. Sometimes it does. This time it didn’t. The only recourse was to spend hundreds of dollars to try and recover the data. And buy a new hard drive.

There are many backup options.

Since then I take every precaution to back up all my data.

  • Every project I work on I store in a folder I named “backup”. Clever and informative. Whenever I have chunk of time free I regularly back up all this data onto DVDs and then file them away.
  • I have a 1TB external hard drive. Being a Mac person I use Time Machine. I set this up to run a backup every hour. It’s come in handy a few times to rescue lost files.
  • I subscribe to Carbonite. It’s an online, off-site storage company, for both Macs and PCs. There are other options, but Carbonite has a free iPhone app where you can access all your online files. It regularly backs up all the data on my hard drive and stores it offline. Then if something happens to my home, external hard drive and backup DVDs, I’m covered. They do have earthquakes in California, you know.
  • I also subscribe to MobileMe. Big changes are coming soon, I hear. I use this service to backup my QuickBooks for Mac and Quicken.
  • I also use MobileMe to backup my home data, contacts, calendar and mail.
  • My music and photos are also backed up online, through Time Machine, on DVDs, Carbonite, iPhone and iPad.
  • I use Todo to store all my todos online with the Appigo sync service. I’ve also got all my todos on my iPhone and iPad using the Todo app. If only I would do my todos I wouldn’t need to store them.
  • I bought 1Password for my iPhone, iPad and Mac. This stores all my passwords and sensitive info. It’s a great program that asks you if you want to store login info whenever you log into something online.

Am I paranoid about losing my data? You bet. It’s happened. And it’s not unusual.

I highly recommend you look into some form of data backup. Better to be safe than regret losing data or memories permanently.

Also check out How to Backup Your Data & Installation Discs from Gigaom’s Apple Blog.

Have you got backup horror stories? Share them here.

Sign up NOW for our fun and informative newsletter.

Free Marketing Tips

Apps Business Practices Helpful Hints Technology
06 Dec

Setting Up Apple TV and MobileMe

MobileMe Account Setup

I was excited to learn that Apple TV includes MobileMe. I clicked on the menu and was asked to “Add a MobileMe Account”. The way to enter text using the Apple TV remote is tedious, at best. You use a click wheel and scan through the letters onscreen. It’s the same way with Verizon Fios TV, which is also a pain.

I attempted to enter my MobileMe account but was given a message saying it did not exist. After some research I learned that maybe if I changed my MobileMe password, Apple TV would recognize my account. I did this and received the same results.

Apple Tech Support to the Rescue

Out of frustration I called MobileMe support and learned that I had to have photos in the MobileMe gallery in order for it to work. I uploaded some photos and indeed it did work. Over the years I have found Apple tech support to be very helpful.

Photos Only for Apple TV and MobileMe

Apparently MobileMe on Apple TV is only for photos. You do not get access to your calendar, e-mails or any other content. This was disappointing. I wish I knew that from the beginning. It would have saved me a lot of trouble setting it up.

Overall I have been very pleased with Apple TV and especially Air Play. I can easily play audio from my iMac, MacBook as well as my iPhone and iPad through my Panasonic TV and speakers. Unfortunately it does not work with Sirius radio yet. I look forward to more functionality in the future.

Apps Computer Tech Support Helpful Hints iPad iPhone Software Technology
28 Sep

Todo is Now in the Clouds

Having just written about Appigo Sync version 1.2.0 I feel I must also talk a bit about today’s update to version 1.2.1.

This new update occurred just a day or so after the previous update. This time I had no problems with duplicate content or the inability to sync. Everything worked fine.

Now that the iPhone update is optimized for iOS4, it remains open unless you close it in the multi-task bar. Because of this, it does not automatically sync after initially opening unless you manually press the sync button.

New Todo Online Service

For $19.99 per year, Appigo is offering Todo Online “Over-the-Air-Cloud-Sync”. What this does is sync your todos, projects, checklists, alerts, etc. with an online cloud service. This means you do not have to sync your Todo app with your computer and Appigo Sync. So you can sync your iPhone, iPad, iPod Touch and iCal with the online service, no matter where you are, and even view your todos on any computer. And it’s always up to date.

Of course, if you have daily access to your “base” computer with your iThings, and you’re the only one using your iStuff, I’m not sure what the benefit is over the free Appigo Sync software, other than having a (hopefully) reliable backup.

What is not clear yet, is if this new Todo Online service will sync up with the new iCal MobileMe when it comes out of beta. This is where iCal content is only stored online and not on your computer. We shall see.

Apps iPad iPhone Software Technology Uncategorized
19 Sep

How to Add a PDF File to a WordPress Page that Doesn’t Open an Extra Page

Adding a pdf link to your WordPress page gives a link. But when you hit the link online sometimes a new page opens, usually with a comments box. You then have to press the link again.

Here’s an easy way to avoid that.

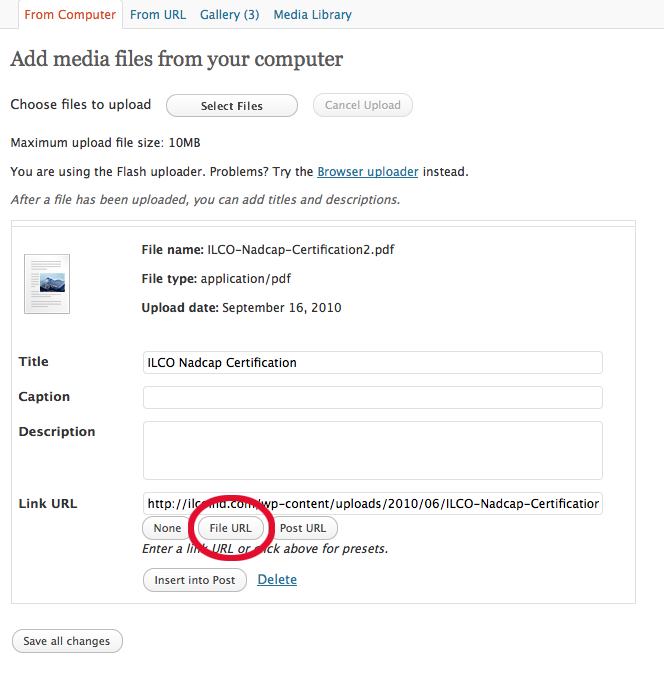
  1. Upload/Insert “Add Media”
  2. Find pdf file and either upload it from your computer or locate the file in your “Media Library”
  3. Click “Show”
  4. Where it says “Link URL” hit the button that says “File URL”
  5. Insert into Post

Hit the "File URL" Button

You will then have a link. Hitting the link will either bring up a dialog box asking to open or download the file or will do either of those depending on your browser’s preferences.

Computer Tech Support Helpful Hints Software Technology Website Design
18 Aug

6 Easy Steps to Add PDF Files to iBooks through iTunes

One of the many great things about your iPhone and iPad is that you can easily load up a pdf file for later reading. Then, whenever you have a spare moment, either while waiting on line at a supermarket or bank, waiting in an airport or doctor’s office, or just waiting for a TV commercial to end (assuming you did not DVR it to speed past commercials), you can click on your iThing and read your latest pdf file or e-book.

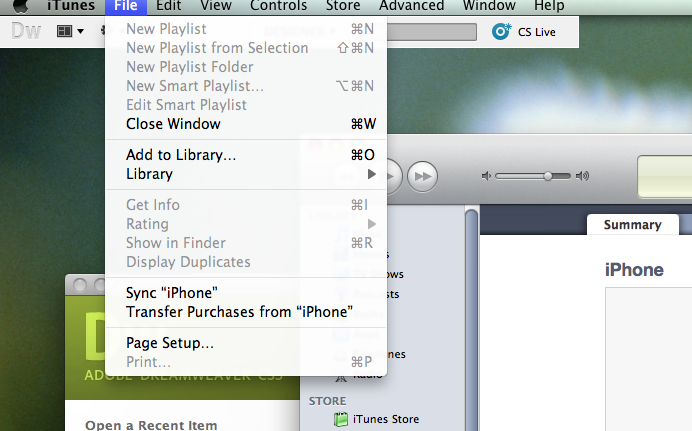
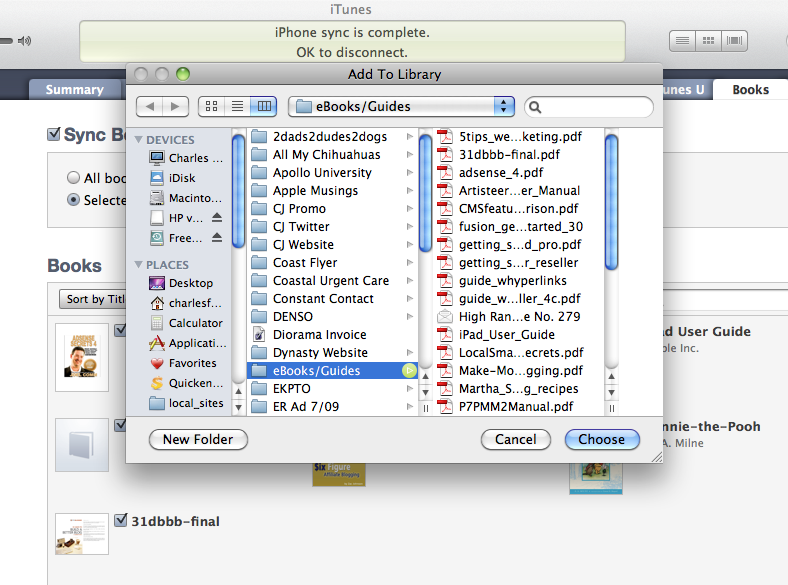
1. Open iTunes.

2. On the top menu click “File”. On the drop down menu click “Add to Library…”

3. Navigate to your e-book or pdf file and choose it.

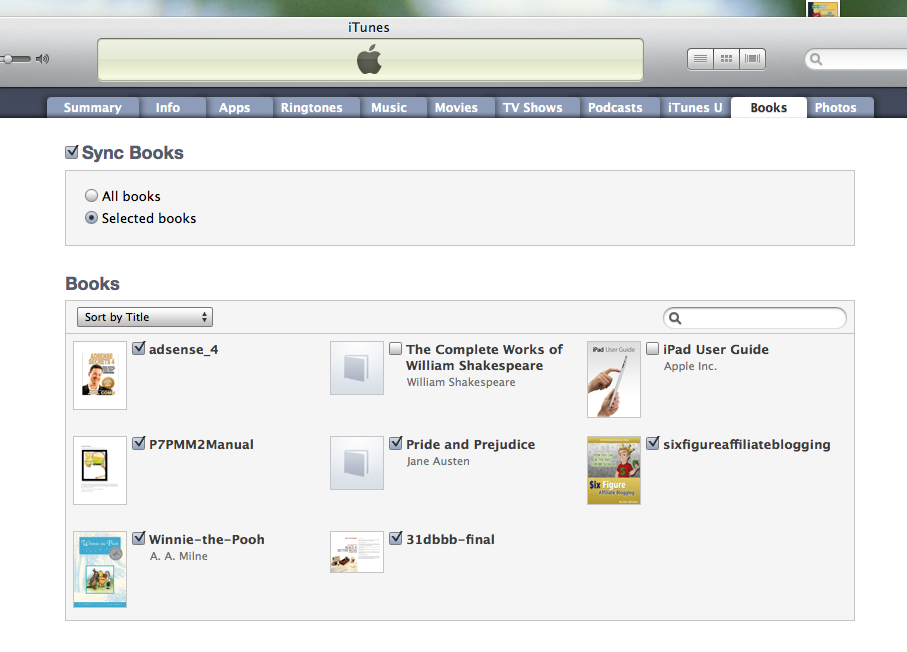
4. In iTunes click on your iPhone or iPad in the side menu.

5. Choose the Books tab and you will see the file. Make sure it’s checked.

6. Sync your iPhone or iPad and your pdf file will appear in iBooks under the pdf tab.

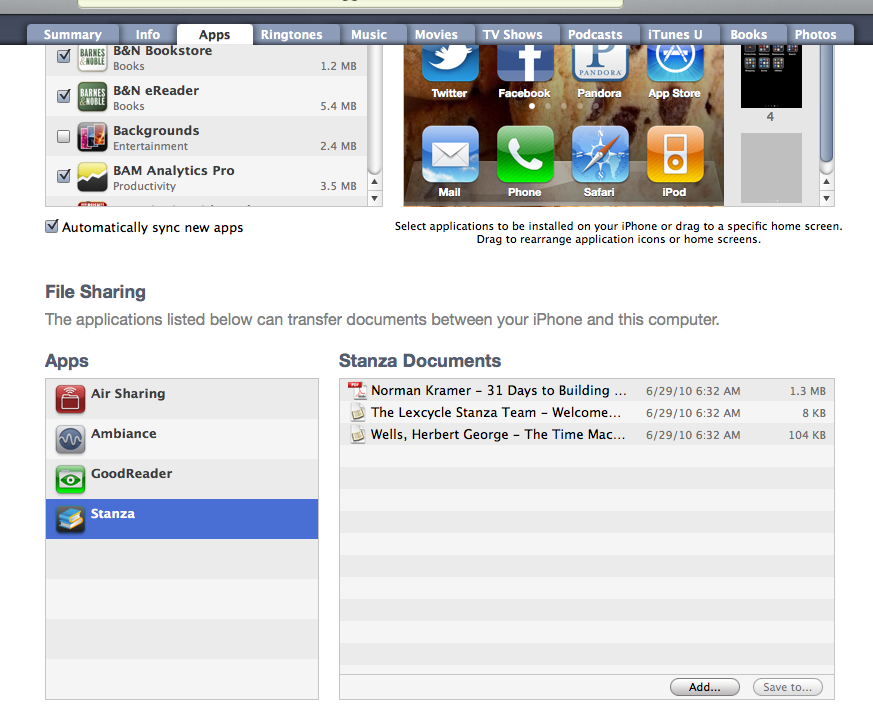
See, it’s simple. There are other ways to get files onto your iPhone or iPad, including Dropbox, Air Sharing, Stanza and GoodReader apps but I’ll leave that for another post.

iPad iPhone Technology
Next Page →

Follow Us

Facebooktwitterpinterestlinkedin

Click Image for Professional Logos Starting at $75

Creative Logos

Sign up for FREE Marketing Tips.

Increase your business!
unsubscribe from list

powered by MailChimp!

Shop Amazon

Creative Juices Graphic Design Studio | Copyright © 2023 All Rights Reserved